Category Archives: Embedded

New Black Magic Debug Maintainer

Hi everyone!

As some of you might know Black Magic Debug was created and maintained for many years by Gareth McMullin. He has created a wonderful tool that we all use and love. You might have also noticed that Gareth did not have much time to dedicate to the project for the last few years. He asked me a while ago if I would be able to take over the project and become an official maintainer of Black Magic Debug. I did not have the necessary resources to dedicate to the project until very recently. But it is finally time, from now on I am officially taking on the position as the Black Magic Debug maintainer. 🙂

I want to thank Gareth for putting the faith in me and creating this amazing project. I also have to say big thanks to Uwe Bonnes who stepped in while Gareth and I were unavailable to keep the patches and Black Magic releases going.

I have a lot of plans for the Black Magic project, software/firmware and hardware wise. You might have noticed I already spent some time catching up on and cleaning the GitHub issues. It is by no means finished and probably never will be, but I hope we can keep open issues and pull requests on a better level going forward.

To resolve the issue that the native Black Magic Hardware is currently not available due to chip shortages, I am working on the new revision of the native hardware. This should make them available again and allow us for more alternative chip choices. We are adding some cool new features to the new hardware while we are at it. (more information soon) I am also working on a tool that will help users manage the Black Magic Probe firmware, opening doors to more flexibility and versatility of the project overall. (also, more information about that soon)

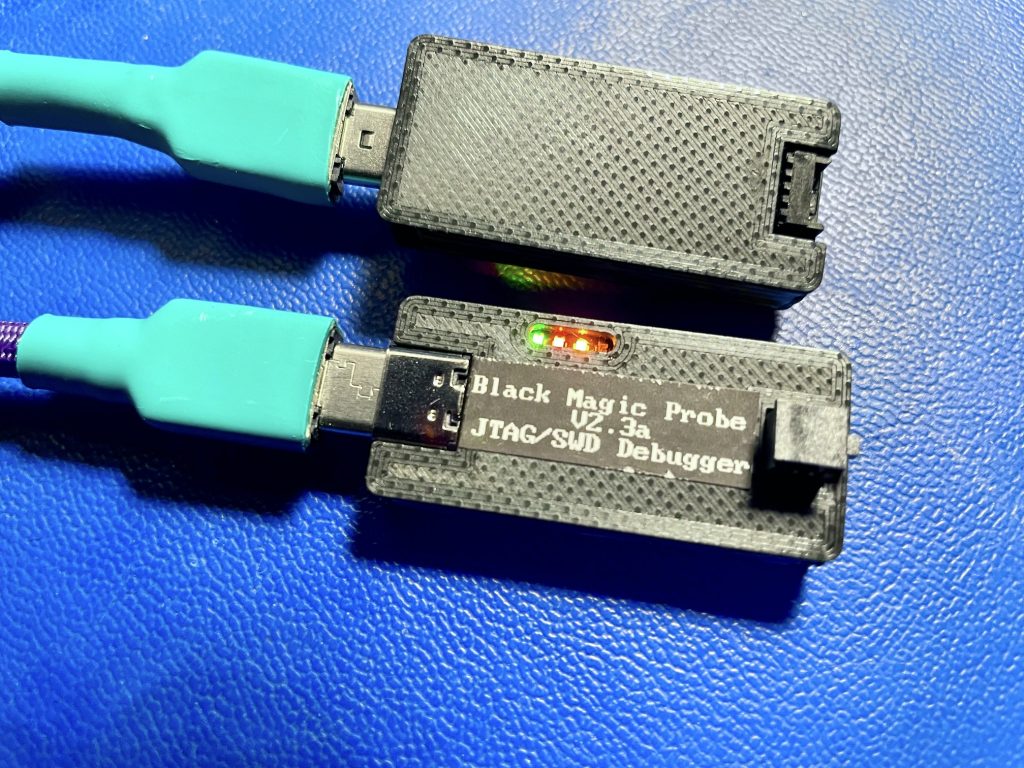
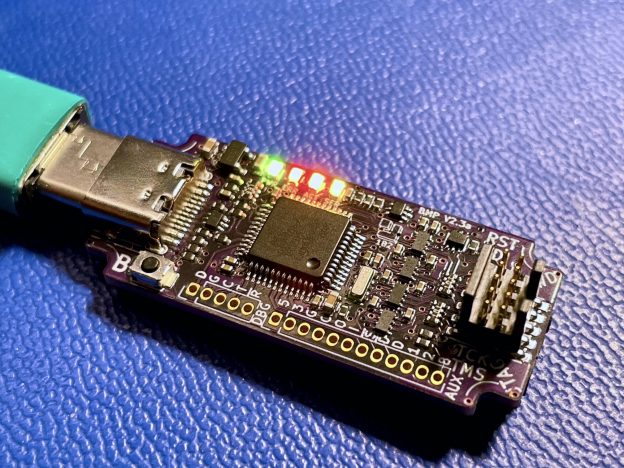
A small teaser of the new native Black Magic Probe hardware V2.3a
3D Printed cases for BMP V2.3a

You can also expect that we will finally get a proper CI system including HITL (Hardware In The Loop) testing. Something we are in dire need to keep the stability expectations as high as possible. I was collecting a lot of hardware over the years and I want to put it together to some good use. We will also improve the contribution process and document the APIs better, this should hopefully make addition of new targets easier.

There is one more thing that I would like to mention. In the process of changing maintainership the GitHub organization that the project is under will be changing it’s name. As it is not developed by Blacksphere (Gareth’s consulting company) we will be renaming the org to the project’s name itself. It will serve as an umbrella for additional repositories related to the Black Magic Debug project. Don’t worry GitHub should redirect the old organization names to the new one. I hope it will not cause too much disruption. We will also finally be officially retiring the SourceForge project page to avoid confusion. This means the old unused mailing lists will be disabled.

If you have questions or concerns and want to get in touch with the project you have multiple options: open an issue on github, join the 1BitSquared Discord server and talk to us in the #blackmagic channel. If it is something you would rather discuss one on one, you can also write an email to: contact at black-magic org where you will be able to reach the core developer team.

I am excited to work with you all to bring the Black Magic Debug project to the next level.

Stay safe, cheers,
Piotr Esden-Tempski

libopencm3 Discovery

Hi everyone,

As promised in the previous post. Here is a short write up how to download, compile and upload your first example program using libopencm3 and a STM32F4 discovery board.

Very similar process will apply to any other evaluation boards that employ an STM32 microcontroller and Black Magic Probe JTAG/SWD programmer. Like for example Lisa/M, Lisa/MX, Lisa/S, Apogee and so on.

Step 1

If you did not already do that, download and install GCC ARM Embedded. You might have already done it if you were “fixing” your Discovery board.

You can download the compiler from here: https://launchpad.net/gcc-arm-embedded

Unpack it into your home directory:

cd ~
tar xfvj ~/Downloads/gcc-arm-none-eabi-replace this with the version-mac.tar.bz2

You should add the binary directory of the newly unpacked compiler package to your system. Obviously to do this you add the directory to your PATH environment variable. If you don’t know what that is you should learn a bit more about your Unix/Linux basics. 🙂

export PATH=~/gcc-arm-none-eabi-someversion/bin:$PATH

To make this addition persistent you can also add that to your .profile, .bash_profile or .zprofile depending on the shell and setup you use.

Step 2

Download libopencm3-examples. You can find this repository at https://github.com/libopencm3/libopencm3-examples

git clone git@github.com:libopencm3/libopencm3-examples.git

Step 3

Build the libopencm3 examples. The repository contains libopencm3 as a submodule so you will have to initialize and update the submodule before you can compile the library itself as well as all the different examples.

cd libopencm3-examples
git submodule init
git submodule update
make

This will take a bit as there is a lot of examples included in that repository. In the past the examples were part of the main library itself but there became so many of them that we had to split it off. Otherwise the build and clone process just took too long.

Step 4

Prepare your environment. To make your life easier you should set up your .gdbinit configuration file. This will make the firmware upload and debug process so much easier. Just add the following lines to the .gdbinit file:

set target-async on
set confirm off
set history save
set mem inaccessible-by-default off
tar ext /dev/cu.usbmodemSOMESERIAL1
mon version
mon swdp_scan
#mon jtag_scan
att 1

Note: On linux the cu.usbmodemSOMESERIAL1 becomes ttyACM0.

For reference here is the breakdown of what the commands inside of the .gdbinit file mean:

  • set target-async on: Enable background execution commands.
  • set confirm off: This disables the really annoying “are you sure” questions. 🙂
  • set history save: This forces GDB to save the command history.
  • set mem inaccessible-by-default off: This is one of the most important commands here. Very often when you are trying to debug your code on a microcontroller you have to read the content of memory mapped registers. If you don’t set this option the debugger will prevent you from doing so as it has no idea that this memory is actually accessible. On a PC having the option on makes total sense but on a microcontroller it is mostly a burden.
  • tar ext /dev/cu.usbmodemSOMESERIAL1: tell gdb to connect to Black Magic Probe
  • mon version: Print version of the Black Magic Probe.
  • mon swdp_scan: Scan for devices using SWD protocol.
  • att 1: Attach to the first process. On a microcontroller you will have only one process…

Step 4

Upload fancyblink example. The simplest example for the STM32F4 Discovery board is the fancyblink example. It is also very easy to upload. As long as your Discovery board is “fixed” and uses the BMP firmware.

cd examples/stm32/f4/stm32f4-discovery/fancyblink
arm-none-eabi-gdb fancyblink.elf
load
run

Now the LEDs on the Discovery board should be blinking. You can interrupt the execution of the program by pressing <Ctrl>-C. You can continue the execution by running cont.

Here is a short reference of GDB commands that you might find useful when playing around with code:

  •  load -> load the binary from the provided elf file. (Note: it detects if the elf file changed on the hard disk and loads a new one if available. So you don’t have to quit GDB every time when you recompile your code)
  • run -> start the execution of your firmware
  • backtrace -> print the call stack trace of the current line of code being executed
  • make -> runs make command in the directory you started gdb. Very useful if you want to update the binary you are running really quick.
  • break filename:lineno -> you can add a breakpoint inside your code. GDB will stop the execution of the program as soon as the line is hit by the firmware.
  • step -> execute one single line of code and return back to the command line
  • next -> same as step but it does not enter into the functions called and skips them. Useful if you want to step over functions you know take forever and you are not interested in what they are actually doing. 🙂
  • print variablename -> print the content of a variable
  • print/x variablename -> print the content of a variable as HEX
  • list -> prints the context of the line being executed at the very moment
  • kill -> if used in a GDB script it will reset the MCU and exit GDB. Very useful as last command of a GDB script.

I hope this will be helpful for you.

Cheers,
Esden

P.S. Big thanks to Jack Ziesing for proofreading and introductory paragraph and sparking the work on this article. It is a great help! 🙂

Black Magic Discovery

Hey everyone!

Today I had to fix another STM32F4 Discovery board. By fixing I mean replacing the STLink firmware with Black Magic Probe firmware. I do that on a semi regular basis but as I have not done it in a long time I did not remember the process anymore. Obviously this calls for a blog post with some step by step instructions on how to do it, so that I have a reference in the future. Also you might find it useful yourself.

First of all let’s explain what we are trying to do. The objective is to replace the STLink SWD (Serial Wire Debug) firmware with Black Magic Probe firmware.  The board is setup by default to use a smaller chip to run the STLink firmware to talk to the main stm32.  We need to change the smaller chips firmware.  The initial adjustments to the board are needed to be able to access the programming pins of the smaller chip and replace it’s contents to Black Magic Probe firmware so that we can use GDB (GNU DeBugger) to program and debug the board instead of the very unstable and unreliable proprietary STLink protocol. The adjustments needed to access the small chips programming pins need to be reversed once the firmware is changed to Black Magic Probe firmware, resulting with an stm32 f4 discovery board with Black Magic Probe firmware ready to use.

For the “Fixing” process I use a genuine Black magic probe, I have one of those very early ones with a 0.1″ header that is very useful in this particular case. You can also use a Black Magic Probe Mini with a PCB adapter, make an adapter cable or you can use another Discovery board that has already been “fixed”.

Step 1

First step is to change the two solder jumpers on the bottom of the discovery board.
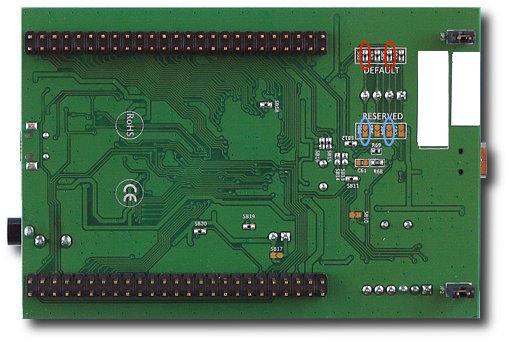
Jumper modification for SWD programming.

Jumper modification for SWD programming.

Remove the 0Ohm resistor/jumpers marked with red circles, and close the jumpers marked with blue circles.

Note: The easiest way to do that is to use a soldering tip, add a bunch more solder over the resistor and swipe them of. After that is done use solder wick to make sure there is no short on the “red” jumper. You can discard the 0Ohm resistors. It is much easier to just add a small blob of solder to close the “blue” jumpers, it is easy to remove them later in the process by just using some solder wick.

Step 2

Remove the SWD and slave MCU jumpers as indicated by the red circles in the photo.

STM32F4 Discovery board Jumpers for updating the programmer chip firmware

STM32F4 Discovery board Jumpers for updating the programmer chip firmware

Step 3

Attach jumper wires to the Black Magic Probe header.

Black Magic Probe Serial Wire Debug connections for Discovery board "fixing"

Black Magic Probe Serial Wire Debug connections for Discovery board “fixing”

Standard JTAG/SWD 20Pin 0.1″ header

  • Black wire – Pin 14 (GND)
  • Orange wire – Pin 9 (TCLK/SWCLK)
  • Yellow wire – Pin 8 (TMS/SWDIO)

In case you are trying to figure out which pins these are on a standard ARM Cortex 10Pin 0.05″ header. Here you go:

Standard JTAG/SWD Cortex 10Pin 0.1″ header

  • Black wire – Pin 3, 5 or 9 (GND)
  • Orange wire – Pin 4 (TCLK/SWCLK)
  • Yellow wire – Pin 2 (TMS/SWDIO)

Step 4

Attach the Black Magic Probe to the discovery board.

STM32F4 Discovery board Serial Wire Debug connection for "fixing" the on board programmer firmware

STM32F4 Discovery board Serial Wire Debug connection for “fixing” the on board programmer firmware

  • Black wire (GND) – Pin 3 of the SWD (CN2) header
  • Orange wire (SWCLK) – Pin 2 of the ST-LINK/DISCOVERY (CN3) header
  • Yellow wire (SWDIO) – Pin 4 of the ST-LINK/DISCOVERY (CN3) header

Step 5

Now you can connect the discovery board and the Black Magic probe to your computer via USB. The order should not matter, but usually I tend to connect the usb wires to the laptop before connecting the SWD wires between the two devices, just to make sure we don’t have some strange current loop that powers one or the other via IO pins, which might be problematic.

Step 6

Now we turn our attention to the software. You can obviously do these steps before you wire everything up but this is the order I followed.

The process requires a few dependencies that you should install using either apt on Linux or homebrew or macports on OS X:

  • Python
  • pyserial

In my case I use OS X and homebrew so I needed to run the following two commands:

brew install python pip install pyserial

Step 7

Download and make the an arm gcc compiler “findable”. I recommend using GCC ARM Embedded as it is maintained by the ARM developers themselves and they seem to generally know what they are doing. 🙂

So download it from here: https://launchpad.net/gcc-arm-embedded

Then unpack it into your home directory:

[code language=”text” gutter=”false”] cd ~ tar xfvj ~/Downloads/gcc-arm-none-eabi-replace this with the version-mac.tar.bz2 [/code]

Then you should add the binary directory of the newly unpacked compiler package to your system. Obviously to do this you add the directory to your PATH environment variable. If you don’t know what that is you should learn a bit more about your Unix/Linux basics. 🙂

export PATH=~/gcc-arm-none-eabi-someversion/bin:$PATH

To make this addition persistent you can also add that to your .profile, .bash_profile or .zprofile depending on the shell and setup you use.

Step 8

Download blackmagic firmware source code. You can get it at https://github.com/blacksphere/blackmagic

The easiest way is to clone the github repository, look for the small window at the center right of the github page for the git repository url. If you have a github account choose the ssh url but if you refuse to do so then you can go with the https one too. 🙂

If you did not learn about GIT and GitHub yet this is the perfect time to take a break from all of this here and come back after you have caught up on your homework. 😀

git clone git@github.com:blacksphere/blackmagic.git

Step 9

Now let’s build the firmware. This consists of three steps:

  1. Fetch the libopencm3 submodule
  2. Build from the toplevel so libopencm3 is built
  3. Build the blackmagic firmware for the stlink
cd blacksphere
git submodule init
git submodule update
make
cd src
make clean
make PROBE_HOST=stlink

Step 10

We can finally connect to the hardware we wired up before and erase the pesky stlink firmware. When the discovery boards ship, the firmware is read and write protected on the STLink chip. So to be able to overwrite the firmware we will have to unlock the chip. Thanks to Gareth there is a small python script that can do that for us. You just have to call the following command inside the src directory of the blackmagic repository and it should be able to remove the write protection:

../scripts/hexprog.py -s -d /dev/cu.usbmodemSOMESERIAL1 -r blackmagic.bin

In the case you are on Linux you can leave out the -d device parameter. For reference the -s parameter tells hexprog to use Serial Wire Debug instead of JTAG and -r tells it to unlock and erase the target chip.

If you skip any of those two parameters it will not work for you.

Step 11

Flash the bootloader. We are getting very close. To upload the blackmagic bootloader you use arm-none-eabi-gdb.

arm-none-eabi-gdb blackmagic_dfu
target extended_remote /dev/usbmodemSOMESERIAL1
monitor swdp_scan
attach 1
load
exit

This sequence of commands attaches to the virtual gdb server that is provided by the Black Magic Probe on it’s virtual serial port 1. (The second serial port is the USB to serial interface located on the back of the BMPM) We then tell the monitor (this is the BMP) to scan using Serial Wire Debug as our protocol. Next we attach to the virtual process number 1. (As we are on the embedded systems there usually should only ever be 1 process unless you run an RTOS) We load the firmware from the elf file that we passed on to gdb earlier and exit GDB.

Simple right? 😀 (Believe me that is definitely simpler than setting up and making OpenOCD work with Eclipse)

Tip: To make things easier for the future you can add the following to your .gdbinit file:

set target-async on
set confirm off
set history save
set mem inaccessible-by-default off
tar ext /dev/cu.usbmodemSOMESERIAL1
mon version
mon swdp_scan
#mon jtag_scan att 1

Note: On Linux the cu.usbmodem device name will be /dev/ttyACM0 instead.

After setting up the .gdbinit file the upload process becomes quite a bit shorter:

arm-none-eabi-gdb blackmagic
load
exit

Step 12

Upload the black magic firmware itself. Here you have two options. Either you can use the same process as before using GDB or you can use the now uploaded DFU bootloader to upload the Black Magic Probe firmware payload. Using GDB you would run the following:

arm-none-eabi-gdb blackmagic
target extended_remote /dev/cu.usbmodemSOMESERIAL1
monitor swdp_scan
attach 1
load
exit

Alternatively you can upload the firmware using a DFU script. Before you do that though you should disconnect the genuine Black Magic Probe from your computer as you want to make sure the script flashes the Discovery board and not your BMP. To do that you will need to install python libusb as an additional dependency. But having done that you can then run the following to upload the firmware:

./scripts/stm32_mem.py blackmagic.bin

Step 13

Put everything back together. Now you just have to do four things:

  1. Disconnect your Black Magic Probe and Discovery board from your computer as well as each other.
  2. Remove the solder blobs you have added on the back of the board.
  3. Add solder blobs to where you removed the resistors at the very beginning.
  4. Put the jumpers back to where they were on the front of the Discovery board.

You are pretty much done now. If everything went well you should have your “fixed” discovery board. Follow to the one additional step below to test that.

Step 14

Plug in your Discovery board into your computer. The dual color led next to the USB connector should be solid Green. If it is blinking Green it means the bootloader is running and the board is expecting to be flashed with the firmware. This can happen if you still have the power jumper disconnected that provides power to the “slave” STM32F4 chip. This is actually very useful if you want to upgrade the Black Magic Probe firmware on your discovery board. 😀

Additionally if everything went well if you are on Mac OS X a /dev/cu.usbmodemSOMESERIAL1 and /dev/cu.usbmodemSOMESERIAL3 should appear. If you are on linux you should be able to find ttyACM0 and ttyACM1 in the /dev directory.

I hope this write up is useful for you and the future me. 🙂 I am planning to write another blog post on how to build and upload an example firmware onto the slave processor. So hold on to your hats! 🙂

Cheers,
Esden

P.S. Big thanks to Jack Ziesing for proofreading and introductory paragraph and sparking the work on this article. It is a great help! 🙂
Black Magic

A few months ago I met a great guy Gareth MacMullin in the libopencm3 channel. He was working on a new Open-Source and Open-Hardware JTAG solution called Black Magic Probe(BMP). I got one of those and instantly fell in love with it.

OpenOCD is great in a sense because it supports lots of targets and probes but that is its disadvantage too. It is very often difficult to set up and tends not to work properly in many cases. The approach of BMP is quite different. Instead of the probe being quite dumb and using OpenOCD to do the JTAG magic the BMP uses a microcontroller (STM32F1) and implements a GDB server inside the controller. This solution cuts out the middleman and talks JTAG as well as the new Serial Wire Debug (SWD) protocol itself. Requiring only a working GDB on the computer.

The BMP supports several Cortex-M3 targets and more devices are being added fairly quickly. The first time I tried it with an STM32 it just worked. No command line parameters just:

arm-none-eabi-gdb some_elf_file
target extended-remote /dev/ACM0
mon swdp_scan
att 1
load
run

It shocked me how fast the loading process was. Because it is not one of the FTDI chips and does not have to bitbang all of the JTAG protocol over USB it can run much much faster. I know there are commercial devices like JLink that have logic inside them but they cost arm and a leg if you don’t want to just get the educational version of it.

One more thing comes to mind when you realize that the BMP supports SWD. You only need three pins to be able to use it GND, SWDIO and SWCLK. That decreases the required real estate on the PCB significantly. I am not sure what the status of OpenOCD support for SWD is now but it is work in progress as far as I understand. On BMP it just works.

Since I started using the BMP there were several interesting developments that Gareth added. The BMP is not only offering one serial port for the GDB extended remote interface but also a second one providing a TTL level UART interface. The BMP also supports tracing by now using the TRACESWO pin. This provides a reasonably high speed tracing. Gareth also wrote a plotter for this feature that plots the contents of traced variables in your code.

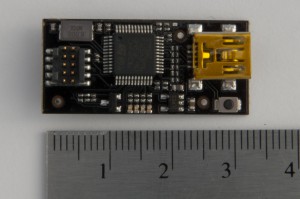
Early versions of BMP were 2.5cm X 5cm the current version called Black Magic Probe Mini (BMPM) is smaller, the same size as the FLOSS-JTAG I made a while ago, it is mere 1.5cm X 3cm, packing in all the power of the BMP what makes it great for doing embedded stuff on the go, for example in the subway.

So to wrap things up, it is a high grade, Open-Source and Open-Hardware device. For $60 this thing is a steal!

Shameless plug: On 1 BIT SQUARED store you can order the Black Magic Probe.

There are also some other distributors listed on the BMP page too. So check it out! I bet you will love it. 🙂

How to build arm gnu gcc toolchain for Mac OS X [Updated 8x]

Hi!

[Edit: This HOWTO is mostly outdated now because of the script summon-arm-toolchain I have created together with Uwe. You can find it here at GitHub. A short description on the usage of the script can be found in the Open-BLDC wiki.]

As I decided to use the STM32 for open-bldc and ordered an Olimex H103 evaluation board. I had to build the toolchain for it. This controller is an ARM Cortex-M3 and needs a GCC version beyond 4.3 because there the support was added.

There is a pretty good HowTo on eLua. But as I decided to use the newest versions of the tools some things changed and I decided to write my own HowTo. And here it goes!

I am using macports on my mac, so the howto is based on that. You need to install additionally gmp and mpfr. It is needed so that gcc can be compiled. I also use for most of the stuff I use stow. The toolchain cannot be installed using stow because of the softlinks it creates. You cane install it using macports too.

Sources:

Now you will need the following:

Compiling binutils:

I store everything that I build by myself in /opt/mine directory. I added it to my path and other relevant environment variables just as I did with /opt/local (the macports install directory). The toolchain needs its own directory. I call it /opt/mine/arm-none-eabi to distinguish it from other arm toolchains that I have on my machine.

I need to add another note here. I chose to use the arm-none-eabi target. This way the toolchain builds Version 4 EABI binaries instead of GNU EABI. I am not 100% sure what the difference is. (Please enlighten me here) But if I understand it correctly the Version 4 EABI is the ARM standarized EABI and not the GNU version of the EABI. But as stated before I am not really sure about that.


> tar xfvj binutils-2.19.1.tar.bz2
> cd binutils-2.19.1
> mkdir build
> cd build
> ../configure --target=arm-none-eabi --prefix=/opt/mine/arm-none-eabi --enable-interwork --enable-multilib --with-gnu-as --with-gnu-ld --disable-nls
> make
> sudo make install
> cd ../..

Now you should also add the toolchain bin directory to your PATH so that the further steps can find the binutils binaries.


> export PATH=/opt/mine/arm-none-eabi/bin:$PATH

Building GCC bootstrap:

GCC needs the newlib to build all of it’s libraries but newlib needs gcc to build. This chicken and egg problem can be solved by building GCC without libraries first, then building newlib and finally building GCC it it’s full form.


> tar xfvj gcc-4.3.3.tar.bz2
> cd gcc-4.3.3
> mkdir build
> cd build
> ../configure --with-libiconv-prefix=/opt/local --target=arm-none-eabi --prefix=/opt/mine/arm-none-eabi --enable-interwork --enable-multilib --enable-languages="c" --with-newlib --without-headers --disable-shared --with-gnu-as --with-gnu-ld --with-gmp=/opt/local --with-mpfr=/opt/local
> make all-gcc
> sudo make install-gcc
> cd ../..

I have to comment here on some options used. Somehow the configure of gcc is not able to find gmp and mpfr by itself. Because they are installed in nonstandard directories when you look at a linux system. That is why you have to help it by providing –with-gmp and –with-mpfr. In the case of libiconv you have to add –with-libiconv. Not adding this option does not break the configure but introduces problems in the build process.

Building newlib:

Now that we have binutils and a basic gcc install we can build newlib. This one is pretty streightforward.

[EDIT This section should be obsolete! The patch does not even apply to the newlib-1.17.0 sorry] Still you will probably need a patch that deals with makeinfo being not found by configure. I found it in a post on comp.gcc.cross-compiling.arm. But I offer the patch here for download and your conveniance.


> tar xfvz newlib-1.17.0.tar.gz
> cd newlib-1.17.0
> patch -p1 -i ../newlib-1.14.0-missing-makeinfo.patch # the patch will yield a warning because it is for an older version of newlib but should apply
> mkdir build
> cd build
> ../configure --target=arm-none-eabi --prefix=/opt/mine/arm-none-eabi --enable-interwork --enable-multilib --with-gnu-as --with-gnu-ld --disable-nls
> make
> sudo make install
> cd ../..

Building GCC:

This should be simple now. We build the full GCC version.


> cd gcc-4.3.3/build
> rm -rf * # clean up everything it makes stuff safer ^^
> ../configure --with-libiconv-prefix=/opt/local --target=arm-none-eabi --prefix=/opt/mine/arm-none-eabi --enable-interwork --enable-multilib --enable-languages="c" --with-newlib --disable-shared --with-gnu-as --with-gnu-ld --with-gmp=/opt/local --with-mpfr=/opt/local
> make
> sudo make install
> cd ../..

Building libusb:
This library and the following libftdi is needed for jtagkey-tiny support in openocd.


> tar xfvz libusb-0.1.12.tar.gz
> cd libusb-0.1.12
> mkdir build
> cd build
> ../configure --prefix=/opt/mine/DIR/libusb-0.1.12
> make
> sudo make install
> sudo -s
> cd /opt/mine/DIR
> stow libusb-0.1.12
> exit
> cd ../..

Building libftdi:


> tar xfvz libftdi-0.15.tar.gz
> cd libftdi-0.15
> mkdir build
> cd build
> ../configure --prefix=/opt/mine/DIR/libftdi-0.15
> make
> sudo make install
> sudo -s
> cd /opt/mine/DIR
> stow libftdi-0.15
> exit
> cd ../..

Building openocd:

I am using the jtagkey-tiny from Amontec, and usbprog. If you are using something else the options to configure will need enabling the other device.


> cd openocd-svn
> mkdir build
> cd build
> ../configure --prefix=/opt/mine/DIR/openocd-svn --enable-ft2232_libftdi --enable-usbprog
> make
> sudo make install
> sudo -s
> cd /opt/mine/DIR
> stow openocd-svn
> exit
> cd ../..

Building insight/gdb:

Well I still have some problems here. I will update the post as soon as I find a solution here.

Compiling and flashing an example program:

Openocd supplied config file for jtagkey-tiny has an error in my case. On my machine the jtagkey-tiny appears as “Amontec JTAGkey” and not “Amontec JTAGkey A”. You have to edit /opt/mine/lib/openocd/interface/jtagkey-tiny.cfg and change the line ft2232_device_desc "Amontec JTAGkey A" to ft2232_device_desc "Amontec JTAGkey".

Now you can download stm32-blink.tar.bz2 that I cleaned up a bit. It is based on the example blink project from Olimex.

The example project from Olimex uses parts of the Firmware Library from ST. The documentation and the library itself can be found and downloaded here. You have to be careful though, the library has a very wierd license that is probably problematic when used in open source projects. I assume that the strange license may pose also problems when used in closed source projects too. But I am not a lawyer so do not kill me if I am wrong. 🙂


> tar xfvj stm32-blink.tar.bz2
> cd stm32-blink
> make

Next step is to start openocd. You should start opencd in the stm32-blink directory so that later openocd can find the binary you will be uploading.


> openocd -f /opt/mine/lib/openocd/interface/jtagkey-tiny.cfg -f /opt/mine/lib/openocd/target/stm32.cfg

Now open a new terminal and run the following commands to flash the stm32-blink binary.


> telnet localhost 4444
> halt
> flash write_image erase stm_h103_blink_rom.bin 0x08000000
> resume 0x08000000

Now the diode on the stm32-h103 board should start to blink happily! 🙂

Notes and links:

Here I gathered some additional links that may be usefull:

Disclamers:

I hope this tutorial is useful. If I made any mistakes feel free to write a comment to this post. I will try to update it if something changes and/or needs to be corrected.

Cheers Esden

Updates:

  • Fixed link to stm32-blink.tar.bz2
  • Changed links to source packages to real links.
  • Added newlib patch for missing makeinfo
  • Added some additional links. For example to the ST Firmware Library and it’s documentation.
  • Added link to the Reference manual of STM32.
  • Removed the newlib patch section.

Ok … back again

It is really time that I write something here. It is nearly one year since I last posted something here. But I was doing some things in the mean time. ^^

First of all I finished my Diploma at the University of applied sciences in Rosenheim. Now I am working at the computer science chair of Prof. Radig. The name of the chair is “Image Understanding and Knowledge-Based Systems” it somehow sounds cool. ^^

But basicly I get payed for programming Common Lisp. My work now involves getting the high level systems running on the real Robot. Till now all the high level planning stuff was only running in simulation.

In my short free time I started the ELCO Project which should become a framework for developing Lisp based software for Embedded systems. But I have to write a more elaborate article on that topic.

And the last thing for today. I just released my first shot on the schematics of a really Open source Brushless Drive Controller. You can find the eagle schematic (yes I know eagle is not open but the open source alternatives just suck!) in a git repository on GitHub.

I also can only encourage you to subscribe me on identi.ca. I am posting bit more frequently there. ^^

Cheers everyone!

Flashing M16C and R8C under Linux and Mac OS X

Yesterday and the day before Uwe and I were trying to flash an R8C and alternatively an M16C under Linux. We were finally successful using the Flasher from Thomas Fischl. You have to be careful to get the one on his site not the original from Lost In The Ether. The original seems to be somewhat broken.

Still there are some points you should be careful about. First of all the image you want to flash has to be for R8C or M16C respectively. The problem is that the addresses contained in the images have different order (endianes) depending on the chip. The sample srecord image contained in the tarball from Fischl is for _M16C_ and _NOT_ R8C.

Next thing is you should try to use a real hardware serial interface if you get problems with a serial to usb converter. We found out that even if the converter contains a prolific usb to serial chip it does not mean that it will work. We have two cables here and we know that Sitecom works.

We will probably write a patch for the flasher program containing some additional documentation and some checks and timeouts. The checks should validate the addresses one wants to flash are valid for the chip, and the program should timeout if it does not get data back from the chip during flashing. At least that is our TODO.

More information to come. 😉

[Update] Added some links.

Lisp in Todays Embedded World Investigation

I continued my reading about Lisp and also searched the Web a bit more for anything related to Embedded Systems. I think that this is a pretty sad story.

I heard from a friend that I missed ecls in my last post. He said that it is possible to compile Lisp to C with it and then you can crosscompile the resulting C source to any architecture you like. But that simply does not feel right. That is only a hack. You miss the things you want the most (beside Lisp itself) REPL and with it the integrated inspector and debugger just like the profiler and tracer. Also you miss binary upload of functions. Think for yourself. If you do not have that things does development with lisp feel like it should? If you ask me it does not.

So I searched further. I knew that there was someone who developed the triple L, Mars and Venus. I did not know what it exactly was but I knew that it was a lisp development environment for embedded systems.

Looking more in depth in to that, I had to realize that the only thing that exists is the paper L – A Common Lisp for Embedded Systems (pdf format is here) by Rodney A. Brooks and Charles Rosenberg. This paper is telling a beautiful story about a development system that would be the thing one would like to have. But you can not get it anywhere! On the page of Charles Rosenberg you find the pointer that the company IS Robots (that was developing L, Mars and Venus) is now iRobot (yes the Roomba guys). Searching their site does not say anything about lisp though.

The only other person bringing iRobot together with Lisp is Lemindor I have not read all his posts yet but he does not really say anything that helps me neither.

I also asked about the topic in #lisp on freenode but it seems that the overall opinion is that everyone is brewing his own Lisp if he/her wants to use lisp on embedded system.

That is really bad news. I was hoping that there will be something I will be able to base on. The only solution that I see now is to take some common lisp implementation and port it to some embedded system. And when it works start changing it and splitting in parts so that it fits development on embedded systems. (you do not really want the compiler on your embedded system normally an interpreter is enough)

That somehow sounds pretty big and heavy. 🙁

The second solution would be to start with a small Lisp implementation by oneself. When you read Paul Graham’s article Roots of Lisp you get the feeling that it can not be that hard. But still I think that is probably a false feeling. But if I had the power and money to hire some people that are bright enough I think I would attack that. I even know some people that are bright and that would be able to create such thing but none of them would want to invest their time in such a project when they do not get money for that. So there is high possibility that Lisp on embedded systems will remain a dream. 🙁